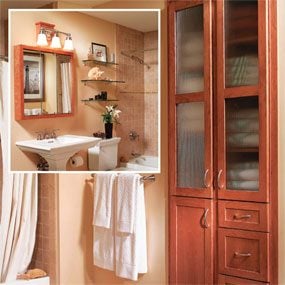
Three Bathroom Storage Ideas
Bathroom Storage
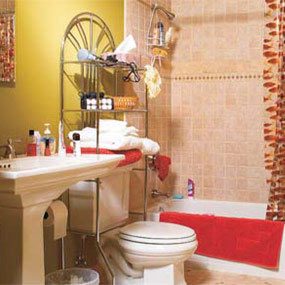
Bathrooms never have enough storage or shelf space. Where do you display knickknacks, let alone store unsightly items like extra toilet paper, blow dryers, curling irons, and cans, soaps and bottles? Once you’ve filled up the vanity, how do you squeeze more storage into a small bathroom?
Three solutions:
1. Upsize existing storage space by replacing that tiny medicine cabinet or mirror with a larger, surface-mounted cabinet.
2. Utilize the space you have by adding glass shelving to the “dead” space over the toilet.
3. Steal space from an adjoining room or closet by insetting kitchen pantry cabinets (or tall utility cabinets) into the wall.
Installing a new medicine cabinet and shelving is easy and fast. Each project takes less than an hour. For these simple projects, you’ll only need a screw gun and a 2-ft. level. We’ll show you a foolproof way to solidly support the cabinets no matter what type of wall you have.
The flush-mounted pantry cabinets are more challenging because you have to cut into the wall and steal space from a neighboring room or closet. But don’t worry. Our step-by-step photos will walk you through the cutting and fitting.
You’ll need a drywall saw, a few 8-ft. 2x4s for cribbing (Photo 10) and a table and miter saw for trimming out the pantry cabinets. You can install the cabinets in one day, but allow another day for walling in the cabinet backs in the room or closet behind the bathroom.
Buying the Cabinets
You can find a wide variety of medicine cabinets and shelves at home centers and kitchen and bath specialty stores. When sizing a medicine cabinet, measure the space you have available behind your sink, both height and width. Keep a few inches away from existing light fixtures (unless you want to move them). Buy a cabinet that fits within those dimensions.
When sizing the larger kitchen pantry cabinet(s) to recess into the wall, look for 7-ft. tall, 15-in. wide cabinets to fit between the wall studs. If they’re not in stock, you’ll need to special-order them. We ordered the medicine cabinet and the pantry cabinets from the same company so the styles would match. Special-ordering also allows you a wider style selection. Expect to pay a minimum of $200 for a barebones, 7-ft. tall pantry cabinet or up to $1,500 for an upscale cherry unit with fluted glass doors like we show.
If you plan on storing linens, towels or larger items, you’ll be happiest with 24-in. deep cabinets, but if the closet they project into is less than 24 in. deep, go with the 12-in. units or cut down the 24-in. ones. When you order your pantry cabinets, also order three matching, prefinished 8-ft. long, 1/4-in. x 2-in. mullion strips for trim around the outside (Photo 19). Also order an 8-ft. long, 3/4-in. x 2-in. filler strip to join the cabinets in the center (Photos 16 and 17). If you’re buying unfinished cabinets, get unfinished boards of the same wood type in the millwork area at the store.
Project 1: A Bigger medicine cabinet
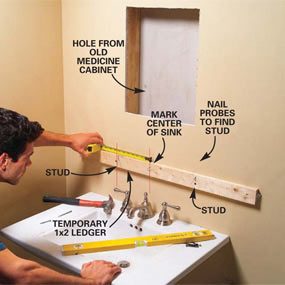
Photo 1: Attach a ledger board and mark the stud locations
Mark the height of the bottom of the cabinet and draw a line with a 2-ft. level. Find the studs by probing with a nail and mark the stud positions above the level line. Screw a temporary 1×2 ledger board through the drywall into the studs. Mark the center of the sink on the ledger, and then measure over from the center mark to the left and right studs.

Photo 2: Mark the stud locations on the cabinet
Mark the center of the cabinet at the top and bottom and transfer the center-to-stud locations inside the cabinet. Start 2-1/2 in. screws at those marks.
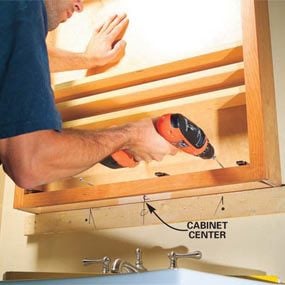
Photo 3: Install the cabinet
Set the cabinet on the ledger and line up the center of the cabinet with the center mark on the ledger. Drive the screws into the studs, then remove the ledger. Fill the screw holes with spackling compound and touch up the paint.

Surface-mounting a large medicine cabinet is simply a matter of centering it, leveling it and screwing it to the wall studs.
Your old cabinet may be surface-mounted or recessed into the wall cavity between the framing. Remove a recessed unit simply by opening the door, backing out the screws in the side of the cabinet and pulling it out of the recess. You may need to cut around it with a utility knife if it’s caulked or painted in around the edges.
Have a helper support surface-mounted cabinets while you back out the screws, or if you’re alone, screw a temporary 1×2 support ledger under the cabinet as we show in Photo 1 to hold it while you unscrew it from the wall. You may need to move or replace the lighting beside or above the old cabinet. Now’s the time to do it.
Hold the new medicine cabinet against the wall and adjust it up and down until the height is a good compromise for your family members, then mark the bottom and set the cabinet aside. Use the mark to draw a level line for positioning the 1×2 ledger (Photo 1). Then follow the photo series for installation details.
Project 2: Glass shelves
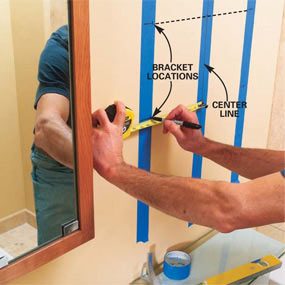
Photo 4: Mark the shelf bracket locations
Apply a strip of 2-in. wide masking tape above the center of the toilet and on both sides where the shelf brackets will be mounted. Draw a center line with a level and mark the heights of the shelves on the center tape. Transfer the heights to the bracket tape with a 2-ft. level. Then measure from the center line to mark the exact left and right locations for the brackets.
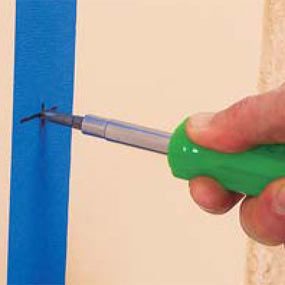
Photo 5: Make indents at the marks
Indent the drywall at the marks with a Phillips head screwdriver and remove the tape.
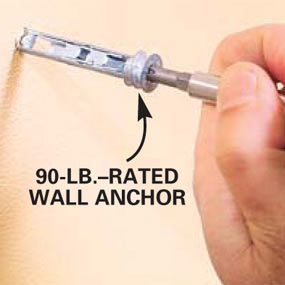
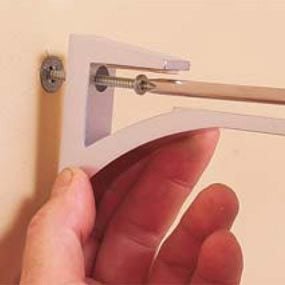
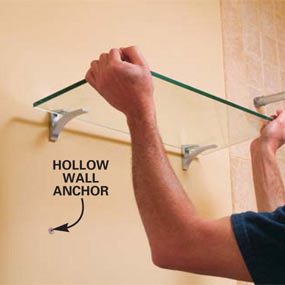
Photo 7: Install the brackets.
Screw the brackets to the wall using the screws included with the anchors.
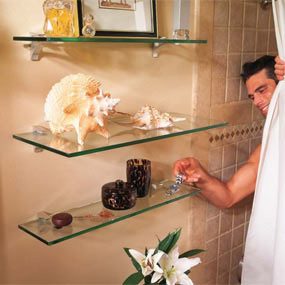
Most bathrooms have one space you can count on for additional storage, and that’s over the toilet. Open glass shelving is a great place to display decorative bathroom bottles or knickknacks.
There are zillions of glass shelving systems on the market. Follow the directions that come with the system for the installation details, but read on for help anchoring them to the wall because you probably won’t have studs exactly where you need them. We used masking tape to avoid marking the walls.
Project 3: Built-in pantry cabinets
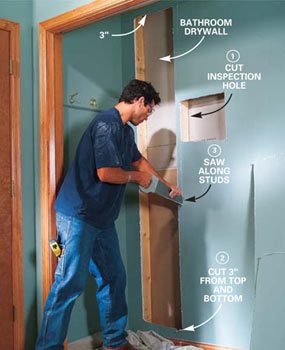
Photo 8: Cut out the closet drywall
Remove the closet rod and shelf from the closet behind the bathroom wall. Cut a rough inspection hole, then check for electrical cables by peering down into the stud spaces with a flashlight. Cut horizontally between the studs 2 to 3 in. from the ceiling and the baseboard. Then cut out drywall using the studs as a guide.
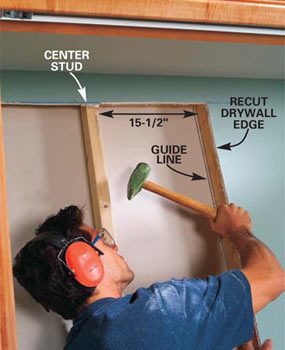
Photo 9: Prepare the framing.
Draw a line along the studs on the backside of the drywall, and then use a 2-lb. maul to pound the side studs over until each opening is 15-1/2 in. wide. Use the line as a guide to tell when the stud has moved about 1 in. Pound mostly at the very top and bottom of the stud to slide it along the plates. Smaller taps between the top and bottom will loosen the grip of drywall screws or nails. Toe-screw the studs to the plates with 3-in. screws and cut off the overhanging drywall edge.
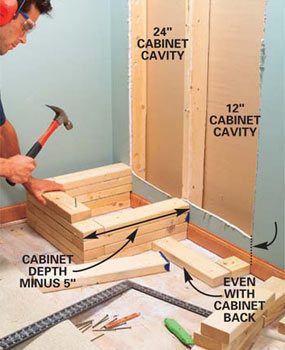
Photo 10: Install the cribbing.
Subtract 5 in. from the depth of the cabinets and draw lines on the floor to mark the cabinet backs. Use the lines to position the bottom row of 2×4 cribbing. Center the middle 2×4 over the center stud so it supports both cabinets. Position the outside 2x4s even with the side studs. Overlap the rows at the corners and nail them together with 10d nails.
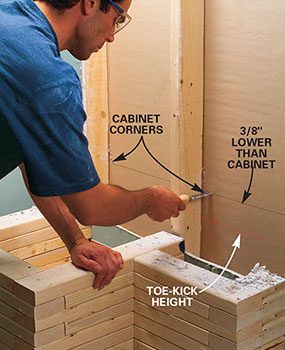
Photo 11: Mark the cabinet dimensions on the wall.
Draw level lines on the backside of the bathroom drywall to mark the top and bottom of the cabinet face. (Base your layout on the cabinet face frame. The recessed toe-kick does not protrude into the bathroom.) Poke a drywall saw through the drywall to mark the corners of each cabinet.
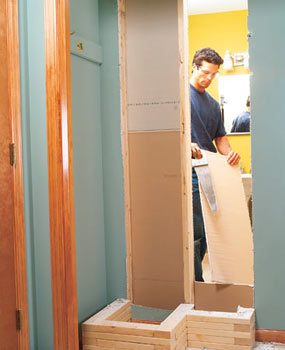
Photo 12: Open up the wall.
Use the corner cuts from inside the bathroom to redraw the top and bottom cuts, adding 1/4 in. to the top and bottom for wiggle room. Cut out the bathroom drywall from the bathroom side. Remove the thin strip of drywall that covers the center stud (Photo 13).
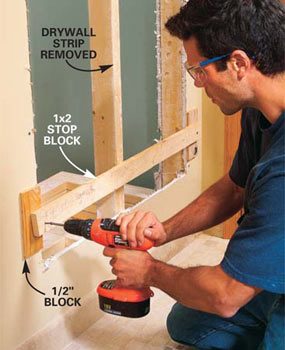
Photo 13: Install stop blocks.
Tack four 1/2-in. thick spacer blocks about 6 in. in from the top and bottom edges of the opening, then screw 1×2 stop blocks across both bays with 3-in. screws.
Most small bathrooms have a similar layout to the one we show; all of the plumbing is on one wall and the door usually swings against a blank wall. Often, there’s a closet on the other side of the blank wall to steal space from. If you don’t have a closet, you’ll have to decide if you can give up 1 or 2 ft. of floor space in the other room and go to the trouble of framing, drywalling, taping, painting and trimming a false wall to conceal the unsightly cabinet backs.
You can either add one or two cabinets to a wall using the method we show. If you want to add more, it’s better to reframe the entire wall. You’ll need a full 14-1/2 in. wide stud space for each cabinet in the blank wall (that space will be expanded to 15-1/2 in. wide). It’s easiest to go into the bathroom and find the studs with a stud finder to see how many 14-1/2 in. stud spaces are available.
When a bathroom backs against a closet, there are rarely electrical cables inside the wall. We show cutting an inspection hole to check for cables or other obstructions (Photo 8). You can usually reroute an electrical cable if there is one. If you have carpeting, unhook it from the tack strips and pull it and the padding back a couple of feet.
You’ll have to cut them both around the cabinets (or false wall), then staple down the padding and push the carpet onto new tack strips when you’re through with the project. Chop off the tack strip in front of the wall openings with a chisel and reuse it at the back of the cabinets.
Crib up the cabinets with overlapping 2x4s to establish the cabinet height (Photos 10 and 11). At a minimum, keep the bottom of the face frame 2-1/2 in. above the bathroom base trim. That way you won’t have any trim or tile work to hassle with inside the bathroom. If you use shorter cabinets, adjust the height for convenience and the best appearance.
Finish the cabinets
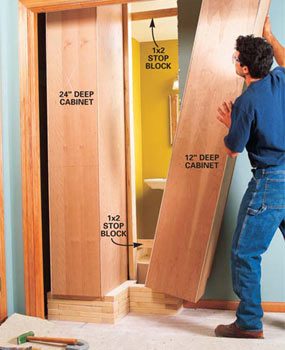
Photo 14: Test fit the cabinet parts.
Remove the doors, drawers and shelving from the cabinets and slip them into the stud spaces to make sure they’ll fit.
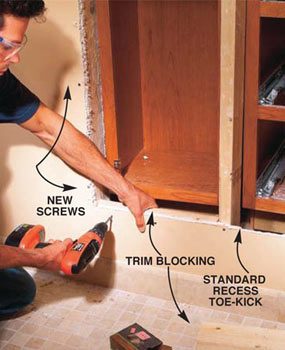
Photo 15: Attach blocking to the drywall
Screw the bathroom-side drywall into the shifted studs. Push back the cabinets a few inches and screw 2×4 blocking to the drywall at the top and bottom for trim backing.

Photo 16: Pull the cabinets flush against the stop blocks.
Rip the 3/4-in. filler strip to 1-3/4 in. wide and cut it the exact length of the cabinet face frames. Slip the filler into the opening, then place it between the cabinets. Pull the cabinets against the stop blocks.
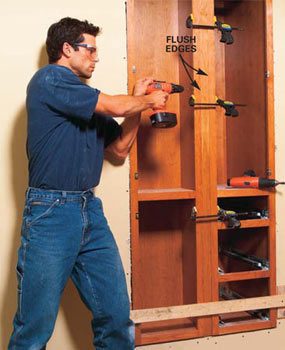
Photo 17: Install the filler strip
Clamp the filler strip flush with the face of the cabinet frames and with the top and bottom. You may have to shim under the cabinet bases to get the tops and bottoms aligned. Then drill pilot, clearance and screwhead countersink holes and screw both cabinets to the filler strip with 2-1/2 in. screws spaced about every 12 in.
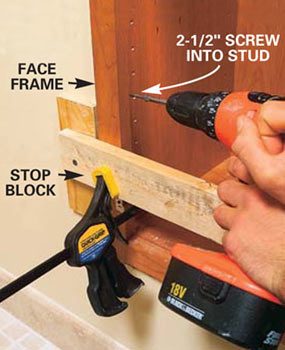
Photo 18: Install the face frames
Hold the face frames tight against the stop blocks with clamps and screw the cabinets to the studs with 2-1/2 in. screws spaced about every 12 in. Be careful not to overtighten the screws and pull them through the cabinet sides.
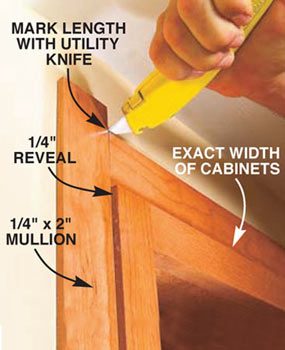
Photo 19: Install the trim
Cut the 1/4-in. thick x 2-in. wide mullion strips the exact width of the top and bottom of the cabinets and nail them on with 1-1/2 in. brad nails. Then mark the side trim for length and cut and nail it to the side studs.
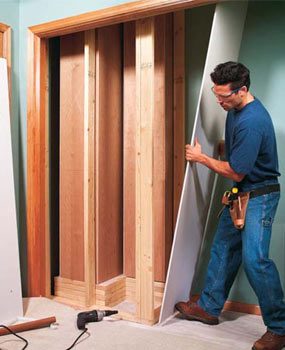
Photo 20: Finish the cabinets
Frame 2×4 stud walls directly behind the cabinets. Nail the bottom plates into the subflooring and the top plates into the ceiling framing with 10d nails. Use construction adhesive to glue any plates and studs that join surfaces that don’t have underlying framing. Hang and tape the drywall and corner bead, then paint.
Finishing around the cabinet backs is optional if they’re in a closet. You can build a separate wall (Photo 20) or put drywall directly against the cabinet backs. If you lay drywall against the cabinets, don’t use screws or nails because they’ll penetrate the cabinet backs. Instead, glue the drywall to the cabinet backs with construction adhesive and use paper-flanged corner beads that you tape on instead of nail.
To minimize taping, stand the drywall sheets upright so you won’t have seams to tape. Cut the drywall to fit tightly into existing drywall at walls and the ceiling and caulk those seams with paintable caulk. That way you’ll only have to tape and sand the corner beads for painting.
Tip:
Sometimes a stud will bow in the center. If it bows toward the opening, push it into position and hold it there by running drywall screws through the drywall into the stud.
Tip:
Check the existing doorstop to make sure the knob doesn’t hit the new cabinets. If a standard stop isn’t adequate, use hinge or floor-mounted stops.
Required Tools for this Project
Have the necessary tools for this DIY project lined up before you start—you’ll save time and frustration.
Utility knifeRequired Materials for this Project
Avoid last-minute shopping trips by having all your materials ready ahead of time. Here’s a list.


Komentar
Posting Komentar